Just some examples below. I don't have the very last images in this computer. However, need to show some potential tile installation customers examples of my work. Will devote a whole additional blog to just tile installation. Will write a lot more on that one. This one's just a test. Will probably delete this post before starting the new blog.
There are over 1,000 images of this particular marble tile job. These are just some of them. Don't know if I can fit just these some in this one post. We'll see...
If you click on the images, you'll be able to see them full size. Four different cameras were used in the course of the installation. Not all of the steps taken are shown in this brief set of images. Hopefully though, these images might show that I sort of knew what I was doing!
Half of these tiles for the floor were new marble tiles while the other half were old and recycled. All the tiles were supposed to be of the same thickness and width; six inches square by one inch thick. This was not the case for either thickness or width. Also, the concrete substrate wasn't perfectly level or perfectly square because of an inadequate job of plastering on the walls.
None of the local tile installers who were contacted about the job would take on the job.
My job, (should I have decided to accept it), was to make them look like they were all the same dimensions, and without any gaps between them.
Thanks!
God's Love, Peace and Blessings to You!
Craig W. Clough
Rock Island, IL 61201
(309) 786-8617
clough7@gmail.com
Now, the image above is REALLY COOL! I wish that I could be that cool!
Front Door Vestibule - Before A
Front Door Vestibule - Before B
Front Door Vestibule - Before C
Cutting Tiles to Size A
Tiles Cut to Size
Laying Tiles Out to Apply Sealer A
Laying Tiles Out to Apply Sealer B
Checking to See How Level the Tiles Are With Each Other
Labeling Tiles As To What Might Be Wrong With Them
Laying Tiles Out to See How They Fit and Look With Each Other. The Start of Selecting a Pattern in the Tiles that Looked Good With Each Other
Seeing Where the Center Tiles Would Be
The Start of the Dry Run in Laying Out the Marble Tiles Without Mortar
Further Work on the Dry Run in Laying Out the Marble Tiles Without Mortar
Further Work on the Dry Run in Laying Out the Marble Tiles Without Mortar 2
Laying Out the Side Tiles to Make Sure That Everything Will Be Exactly Where It's Supposed to Be
Making Room for One of the Large, Rectangular Marble Side Tiles Because the Installed Wooden Floor Stuck Out Too Far
Further Labeling and Laying Out of Marble Tiles.
Also, Labeled Where Some of the Tiles Needed to Be in Addition to What Might be Wrong with a Particular Tile
Making Dummy Triangular Pieces Because There Weren't Enough of the Real Marble Tiles. The Customer Then Ordered More of the White Marble to Use.
Marking Where a Rectangular Marble Tile Needed to be Cut to Size
Making Sure a Marble Tile Measurement for Cutting It Is Exactly Correct
Cutting a Huge Rectangular Marble Tile
Preparing to Cut a Rectangular Marble Tile
The Underside of One of the Old Marble Tiles to be Installed. This Was Typical With Most of the Old Tiles.
Preparing to Cut Triangular Pieces Out of the Old Marble Tile
Laying Marble Tiles With Mortar and Leveling
Filling Gaps in the Underside of an Old Marble Tile
Seeing How Thick to Cut Pex Tubing in Order to Help Level the Tiles. The Green Tape Means That Those Tiles Have Been Mortared in Permanently.
Placing of Pex Tubing Under an Old Marble Tile. I Had to Figure Out How Thick to Cut the Pex Tubing.
Figuring Out How Much Pex Tubing to Cut Off to Level a Tile
Checking the Level of Marble Tiles
Laying Pieces of the Pex Tubing Where They Needed to be For Installing a Marble Tile
Old Marble Tile As Compared to New Marble Tile, Shown From the Side
Mixing the Mortar to Lay the Marble Tiles
Checking the Height of the Pex Tubing
Using the Dummy Marble Tiles
Cleaning Out Dried Mortar on Sides of Tiles to Prepare for New Tile
Marble Floor Tile Installation Is Getting Near to Completion
More Checking to See if the Marble Tiles Are Level
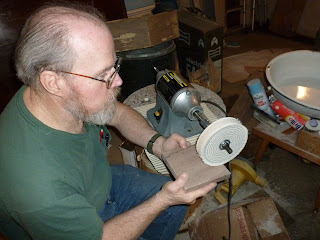
Belt Sander That I Used to Make Small Adjustments to Dimensions of Marble Tiles
Suction Cup That I Used to Pull Dry Tiles Up When I Needed To
Pulling a Marble Tile Up Using the Suction Cup
Buffing a Marble Tile After Cleaning it With Lacquer Thinner. There Was a Lot More to the Cleaning Than That, Though.
More Checking the Level of the Marble Tiles
Mixing More Mortar for the Marble Tile Installation
The Completed Marble Floor Tile Installation Without the Marble Plinth Blocks or Marble Baseboards Installed
Using the Long Level on the Marble Floor Tile Installation. Nothing Like Things Coming Out the Way That They Should!
Marble Tile Installed in the Floor, But Without the Grout. The Customer Didn't Intend for Grout to be Used. However, Mainly Because the White Tiles Had a Slight Chamfer to the Edges and the Old Ones Were Squared, I Had to Use Grout to Make Things Look the Best. If I Had Added a Chamfer to the Old Marble Tiles, Then It Would Clearly Look Like There Was a Gap Between the Tiles and I would Have Also Had to Use More Grout to Fill in the Gap.
That's All for Now, Folks!


